Hello ladies! Are DIY accessories projects your favorite ones? If yes, you are in the right place. In this article, we are going to share with you some easy-to-do DIY collar necklaces that you will simply adore. These projects use supplies that you already have at home, so you won’t have to spend a dollar. Walk around proudly showing your DIY collar necklace and shine!
1. DIY detachable vintage glitter collar necklace
Are you ready for the easiest DIY collar necklace project ever? You will adore this collar necklace because you can easily style it over anything from a maxi dress to a plain t-shirt.
Supplies:
For this DIY collar necklace you will need the following:
- Glitter
- Glue
- Clear varnish
- Felt
- Sponge brush
- Something to cover the surface under the project (paper for example)
- Very small button
- Needle and thread
Instructions:
- First, cut out the collar in felt. Try to cut one that will sit perfectly around your neck.
- Sew one very small button to one of the inside end corners. On the other side, hand-sew a loop thread.
- Cover the entire surface of the collar using glue and the sponge brush.
- Once you have covered the surface with glue, cover it once again with glitter. Let it dry completely.
- Shake the excess glitter and re-glue and re-glitter any surface that has been left uncovered.
- Cover the entire surface of glitter with a clear glossy varnish in order to keep all the glitter attached to the collar.
- Your collar necklace is done! Shine!

2. DIY collar necklace with green and white rhinestones


3. DIY time: shirt/collar necklace

4. DIY- pearls collar


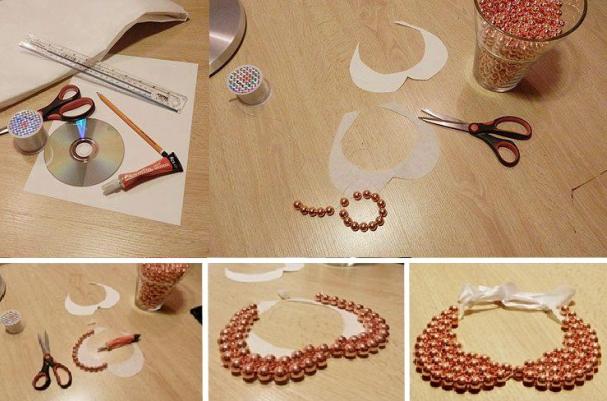
5. DIY Pearl Collar Necklace
Pearls are one of the most favorite woman’s accessories. In this tutorial, we will teach you how to DIY a collar necklace using pearls. This elegant necklace will surely gain all your sympathy.
Needed supplies
For the project you will need the following supplies:
- A template
- Felt
- Glue gun
- Pearls
- Chain
Instructions:
- You can use some templates that you can find on the Internet, or you can create your own one. The shape is less important. All you need to do is to create two identical pieces of the collar necklace template.
- Cut the felt using the template, so that you get two pieces.
- Glue large pearls along the borders on one of the felt pieces. Then, continue gluing pearls randomly inside the bordered felt piece. Fill in the space using smaller pearls.
- Repeat the same with the other felt piece.
- Once you are done, switch together with the front corners of both pieces of felt.
- Stitch on the closure and the chain on the back corners of the collar necklace. Voila, your necklace is DONE!


6. DIY Peter Pan Collar
Are you in for some feminine, pure and so adorable DIY collar necklace project? You will adore this DIY Peter Pan collar necklace that is so easy to be done.
Needed supplies:
- 2 scalloped edged collar pieces cut out from white felt or rubber flannel
- A single hole punch or leather rotary hole punch
- 1 yard of white ribbon
- A needle and thread
- Hot glue gun
- Button
Instructions:
- Use the pattern template to cut out two collar pieces.
- Create small holes between each scallop using the hole punch.
- Push a button through the last two aligning holes and sew it in place from the backside.
- Finally, cut the ribbon into two half-yard lengths and thread it through the last hole on the tapered end. Place a drop of hot glue at the tip and fold it closed. Voila, you are done!

7. DIY neon gem necklace

8. DIY Petter Pan collar


9. DIY: Studded Collar Necklace From Leather – Paper Fasteners
Here is another adorable DIY collar necklace project that you will adore.
Materials:
- A piece of leather
- Paper
- Gold paper fasteners
- Small X-Acto knife, screw punch, or leather hole punch
- Pencil
- Sharpie or marker
- Ribbon or thin cord
Instructions:
- First, using a pencil draw the desired collar pattern into a piece of paper and cut it out.
- Then, place the pattern over the backside of the leather piece and using the marker trace the line where you will need to cut later. Once done, cut the collar out of the leather piece. Tip: Don’t forget that you will need two pieces of collar.
- Using an X-Acto knife, screw punch, or leather punch make a small hole at the edge of each of the leather pieces.
- Slide a paper fastener through both holes and bend the legs open to secure in order to connect the two pieces of leather together.
- Continue making holes and adding paper fasteners to them. You can make however holes you want to get the desired DIY collar necklace look.
- To create the back closure, make a hole at the end of each side of the collar and then knot a piece of ribbon on both sides. Your collar necklace is finished.