Hello DIY lovers! Are you ready for some new and inspiring DIY projects? Today we are sharing with you some crafty DIY handbags projects. If you are from those women who can’t leave the house without a purse or a handbag (and you definitely are, because most women are), then don’t miss these easy DIY handbags tutorials below. These handbags are the perfect addition to any outfit you style. Accessorize yourself with any of these DIY handbags. Or, simply make one of them and give it as a personalized gift to your best friend. Scroll down the page to find the DIY handbags project that sparks your eye the most. We are sure you will enjoy the crafty projects so much!
DIY watermelon straw tote bag
If you are searching for the perfect summer bag, then you have definitely found it right here. This adorable watermelon straw tote bag is the perfect beach bag. The supplies you will need for making it are a straw tote, spray paint in pink, green, or white shade, black paint and a paintbrush, and a spray paint sealer. There is nothing easier than this DIY handbags project. All you need to do is to divide the straw tote into three parts. Then, paint the first part green, the second is white and the last one in pink. Once you did it, using the black paint and the paintbrush draw the watermelon seeds on the pink section. Voila, your watermelon straw bag is done. You are ready for the beach!
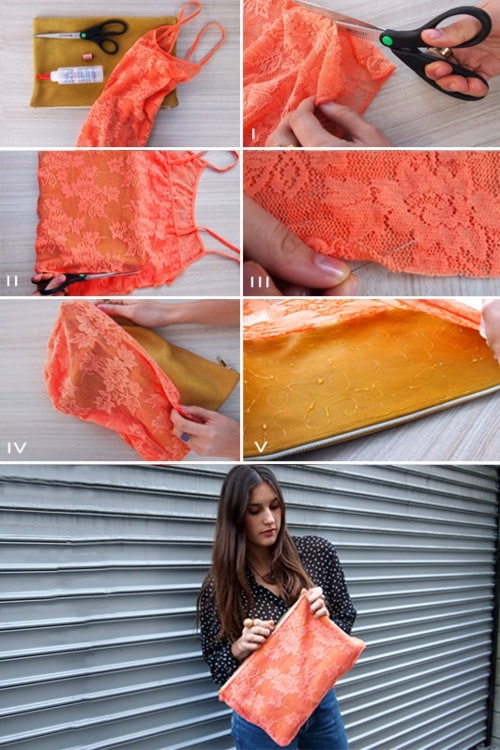
DIY and old lace T-shirt clutch
Another inspiring DIY handbags project that you will adore is the following one. For this lace clutch, you will need an old lace T-shirt, liner material, iron-on interfacing, and zipper, button, or magnetic clasp (optional). First cut the bottom part of the T-shirt creating a rectangle shape of the bag. Then, using a sewing machine and your basic sewing skills, sew the bag from three parts. On the left part, you can sew a zipper, a button, or a magnetic clasp. Your clutch is done!
DIY a gift bag out of paper
If you adore DIY projects, and at the same time you adore gifts and giving, you will like to see this super easy DIY gift bag out of the paper project. Materials you will need for this DIY handbags project are wrapping paper, scissors, scotch tape, and a ribbon. First, cut a rectangle of paper big enough to cover the item you are going to wrap in it. Place the paper on a flat surface, nice side down. Then fold the right and left sides down to the middle until they overlap a little. Tape or glue them to stay together. Make a fold with the bottom of your gift bag and press it. Open the bottom fold and flatten each corner to make triangular shapes. Fold each side of the bottom toward the middle, they have to overlap some, and tape them in place. Your paper gift nag is done.
DIY reversible bag
For this reversible DIY bag you will need some old fabrics from some old clothes. All you need to do is to cut four pieces in the same dimensions, set A and set B. If you want pockets, you will need to sew them before going to the next step. Once you cut the pieces, using a sewing machine, sew the bottom and sides of each set. Put set B in set A, right sides together, and sew around the straps. Clip rounded corners. Turn the right sides out through one of the straps. Pull out each of the remaining straps. Sew the straps of each set together. Press the seams open. Fold seam allowances on straps and press. Also, press the edges of the bag to make it easier for topstitching. Match the seams of the top together and pin all open edges of straps. Your handbag is done!
DIY handbags out from belts
If you have found a load of old belts in your wardrobe and you don’t know how to use them, don’t worry, we have a DIY project for you. Use your old belts to DIY a new and versatile handbag that is fashionable and modern. Use a drill or leather punch to create holes along the edges of your belts so you can later sew them together and form the bag body. Then sew or glue a lining to the backside of the belts and use another belt for the strap. That is all you need to do to have your belt handbag done.
Did you like our suggestions for these DIY handbags projects we shared with you? We hope you did. And we hope you will try some of them very soon. Once you do it, share your final result with us.


