Hello DIY lovers! Welcome to another DIY adventure. In this article, we are inviting you to see some of the easiest DIY winter accessories projects ever. If winter is not your favorite season because of the cold, once you try these DIY winter accessories that will keep you warm, you will simply adore them. Most of them are upcycling projects, and the only supplies you will need for them are some old clothes that you already have at home. Is there anything better than reusing those old pieces of clothing that you don’t wear anymore? In less than ten minutes you can transform your favorite old sweater into a new hat, leg warmers, gloves… or whatever your imagination can create.
Scroll down the page to get inspired by these DIY winter accessories projects below. If you were looking forward to some fun during the winter, we assure you that you have already found it! Enjoy!
1. DIY felt flower pin

2. Faux fur: trapper hat
Searching for a hat that will keep you warm even during the most freezing winter days? If you can’t find it, you can DIY it. This DIY winter accessories project below will help you DY trapped hat like a pro.
The supplies:
- Fur fabric
- Outer fabric
- Snaps
- Cord for chin ties
- The pattern (you can find it on the Internet and download it free!)
The steps:
- First, cut the pattern pieces out.
- Once you have all the pieces, you can start sewing.
- Sew the pieces of each fabric together. Start with the sides of the central rectangle. Align them in the front of the hat and work back for both seams.
- Add the front brim.
- Sew the layers together by sewing the outer fabric to the inner fur fabric. The best is to sew around the entire perimeter of the hat leaving only a little gap in the back to pull the right side out.
- Once done, clip the seams. When done turn the hat inside out. Fold under the outer fabric and fur and sew up the gap.
- Add the snaps for earflaps.
- Tack the brim firmly.
- Make ties and attach them to the hat by hand or by machine.
- Voila, your trapped hat is finished! You can now beat the cold.

3. Do It Yourself: Fur Ear Muffs

4. Faux Fur Pompoms

5. Tips for sewing sweater knit

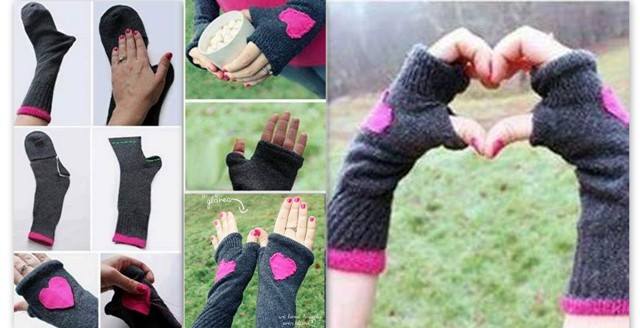
6. Fingerless Sock Gloves

7. Turn One Old Sweater Into Three New Accessories

8. Cozy Mittens from Old Sweater

9. A skirt and leg-warmers for a cold wintry day
Did you miss our DIY leg warmers article? If yes, in this DIY winter accessories projects article we are going to remind you of the easiest way to keep your legs warm during winter.
In order to DIY, these leg warmers all you will need is an old sweater.
The steps:
- First, decide how long you want your leg warmers to be. You can use the entire length of the sleeves. Cut the sleeves off.
- Turn them inside out and try them on to see if they fit you right.
- Find the seam and pull the extra fabric together.
- Using fabric chalk to create a path. You can use the pins as a guide for the path.
- Sew along the path you created.
- Try your new leg warmers to see if they fit you the way you desire them to.
- Turn them inside out again and cut off the fabric just outside to do the stitching.
- Voila, your DIY leg warmers are done!

10. DIY: No-Sew Fringe Scarf
Scarves are among the most popular winter accessories. If you want to enrich your closet with a new scarf that will keep you warm during the cold winter days, here is a perfect DIY winter accessories project for you.
The materials:
In order to DIY your new scarf you will need the following supplies:
- ½ yard fabric (the best choice is a fabric made out of rayon)
- Ball of yarn
- Scissors
- Needle and thread
- Optional you can decorate the scarf with buttons.
The steps:
- First, on one side of the scarf make very small tiny slits using the scissors. You can make about 30 slits for a scarf, depending on how thick your yarn is. Repeat the same with the other side of the scarf.
- For each slit, you create you will need to cut one piece of yarn about one foot long each.
- Fold the piece of yarn in half. Then slide it through one of the slits halfway and insert the ends through the loop. Pull to secure and make a knot over the loop.
- Repeat the same procedure with the rest of the piece of yarn.
- Once you end up the procedure with the last piece of yarn, your scarf is finished.
- Optionally, you can add buttons to decorate the scarf. Hand-sew the buttons using the needle and thread. And your creativity.