More and more women got crafty since we had to spend more time at home during the pandemic. If you are one of them and want some inspiring DIY projects to try, then we recommend the following DIY accessories projects. Making your own accessories is a great way to stand out from the crowd. It is also a great way to express your creative side. With the help of only a few inexpensive materials, you can easily make DIY accessories that look expensive and luxurious. Make them for yourself or for a gift for your friends. Today, many women appreciate handmade gifts, so if you want to surprise your best friend with a unique present, here are some ideas to follow.
In the gallery below, explore some of the easiest DIY accessories projects to copy right now. The step-by-step tutorials will make it easier for you to finish the projects as a professional. We are sure you will fall in love with most of the DIY accessories projects at first glance. Get inspired and crafty! You will enjoy the DIY process for sure.
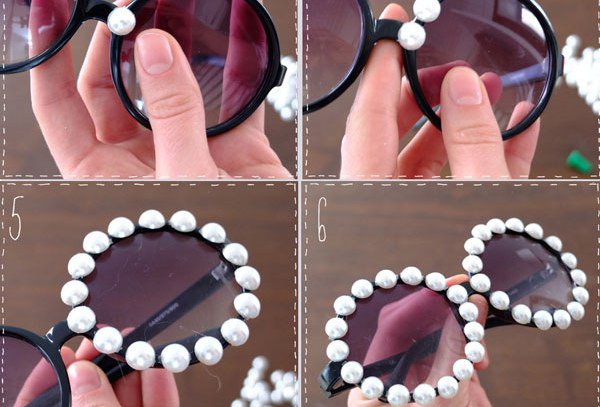
1. DIY fashion individual sunglasses

2. How To Make a Bow Tie – A Beautiful Mess
 source
3. The Bib Necklace
Here is an easy way to spice up any outfit without too much effort: the DIY bib necklace. If you want to add a little glamour to a basic T-shirt or little black dress outfit, then this versatile neckpiece is your wardrobe must-have. Before you start the DIY accessories project here is a shopping list with the items you will need for it. All you will need is 2 felt squares, assorted buttons or gems, ½ m gold chain, 2m ribbon, fabric scissors, and fabric glue. Follow the easiest steps to create your own unique necklace.
First, create the ideal bib pattern on paper, and then cut it out and pin it onto the felt. Cut the felt shape twice for the front and back of the bib.
Then take the ribbon and cut it in half. Fold each piece and secure the ends to the underside of the bib on either side using the fabric glue.
Create your own pattern with the buttons or germs, securing each of them in place with the help of glue.
Sew a double layer of chain to the far corners of the bib. Add a button to the same point.
Your necklace is finished!

4. DIY: Button Bobby Pins

5. DIY: Pistachio Necklace

 source
6. DIY: Beaded Bow Bracelet
One of the most feminine DIY summer accessories projects ever is waiting for you. This cute beaded bow bracelet is the best accessory to brighten up any summer outfit you style. Here is what you will need for your DIY beaded bow bracelet project:
- 1 large hose clamp
- 2yds pink ribbon
- Multiple strands of a beaded necklace or beads
- Wire – super thin about 22 gauge or smaller
- Hot glue
First, unscrew the hose clamp to make it as large as you need it. Wrap the ribbon around the hose clamp and secure it with a small drop of hot glue.
Measure the strands of beads and cut them all the same length. Take the wire and wrap the end bead of each strand of beads together so they are all attached and parallel. Repeat the same for the other end.
Glue the two center beads to one side of your ribbon-wrapped hose clamp using hot glue. Repeat the same procedure with the other side.
Take the remaining ribbon and make a bow. Using hot glue, glue down the ribbon bow to the rest of the bracelet. Your DIY beaded bow bracelet is ready!

7. Fancy Friendship Bracelets


8. DIY: Beaded Hair Elastics

9. DIY Ribbon Wrapped Ring

10. Baroque Buckle Bracelet DIY
Are you ready for the easiest fall DIY accessories project ever? This baroque buckle bracelet is the easiest way to add a fancy touch to your everyday fall outfit. For your DIY project you will need the following supplies:
1 Piece of felt
- 1 Large stone
- 4 Medium oval stones
- 4 Medium rectangle stones
- Small bugle beads
- Needle & thread
- Beading needle
- Fabric glue
Here are the steps to make your bracelet:
First, make a template to cut your felt and cut out two pieces of the felt using the template. Start laying your large and medium stones and mark their placement. Glue the stones on the felt or sew them depending on their type and size.
Start with the largest stones, and then continue with the smaller ones. Cover the entire felt with stones. When it is all covered with stones, open your leather buckle and place the two ends on either side of the felt. Mark the placement. Place leather glue on the marked places. Then place the buckle ends on the glue, and press them down. Voila! You are done!