Hello to all the DIY lovers. We have selected some inspiring DIY projects for you. In the article below, we are going to present you with some inspiring DIY bracelet ideas that you will definitely adore. These DIY bracelet ideas are everything you need to try when you want to enrich your jewelry box with some new and handmade jewelry pieces and accessories. Scroll down the page and explore these adorable ideas that you can make on your own. These projects will only require you some supplies that you already have at home, so they are definitely budget-friendly and must-try ones.
1. DIY: Bright Chain Bracelet

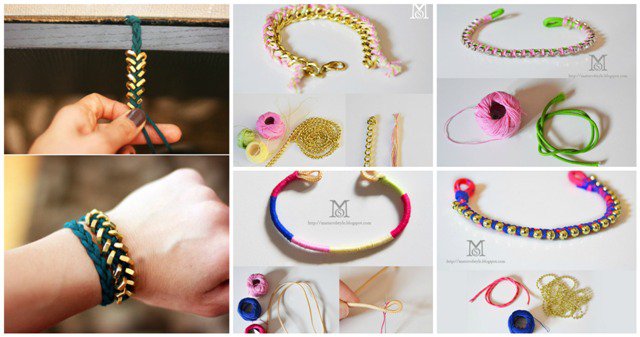
2. Build your arm party: How to make 5 bracelets in 10 minutes

3. Scarf and chain bracelet
Scarves are a huge trend for the spring season. That is why we have tried to find some DIY bracelet ideas including scarfs for you. This one is definitely going to become your favorite.
Here are the supplies that you will need for this DIY bracelet idea:
- Scarf
- Large chain
- Needle and thread
- Scissors
- Pins
The steps:
- First, measure the chain around your wrist. Cut the scarf according to the measurements.
- Weave the scarf through the chan. Make sure to leave enough ends to wrap it and tie it. Adjust the chain on the scarf until it is where you want it.
- Now, take the ends and wrap them around the last link of each end of the chain. Pull tight.
- If you are using a long skinny scarf, then you will need to cut off the extra scarf to make its two sides even.
- Fold a small hem and pin the end of the scarf. Now, take the needle and thread and stitch the seam closed.
- Now, wrap it around your wrist and tie it, making sure you tie a knot that won’t leave it to come undone.
Voila, your scarf and chain DIY bracelet idea is finished. You can now enjoy wearing your favorite accessory- the scarf in a so creative way.

4. Ball chain bracelet

5. Crystal bracelet

6. Yarn bracelet

7. DIY braided anchor bracelet
If you are searching for some super creative DIY bracelet ideas, then here we are presenting you with one that you will adore. This bracelet with a decorative charm is so good-looking and easy to be done.
For the project you will need the following supplies:
- Embroidery floss
- Charm for closure
- Jump rings
- Pliers
- Needle
- Braiding desk
- Scissors
- Ruler
The instructions:
- First, cut each strand of embroidery floss twice the required length. Then fold it in half to begin the braid. Instead of trying a knot to hold the beginning together, create a loop that the charm will go through to hold the bracelet closed.
- Make a small loop and then put the charm through the hole as you would do when you put the bracelet on.
- Now, it is time to start braiding. Wrap the thread around the bundle of braid floss and through the loop you created. Pull the thread tight and up against previous knots to completely cover the bundle of breading floss.
- When you finish braiding, it is time to complete the loop end of the braid. Use the tails from the string used to hold the threads together.
- Make a loop. The tail of the thread should lay along the braid while you use the other thread end to wrap around the braid and loop the thread.
- To finish the braid, attach the floss ends to the jump ring which is attached to the charm.
Voila, you are done!

8. The Chevron Bracelet

9. The Braided Cord Bracelet

10. Woven Chain Bracelets
This is probably one of those DIY bracelet ideas that you will definitely love to try. Chain link bracelets with colorful threads woven through them are very popular and so good-looking. And, they are so easy to be done.
For them you will need the following supplies:
- A curb link bracelet
- Embroidery thread
- Two bobby pins
- A pair of scissors
The instructions:
- First, cut 2 sets of 15 strands of embroidery thread, with each strand measuring four times the length of the bracelet.
- Then, knot all the threads at the top. Leave 2 inches of slack at the top.
- Now, sandwich each of the two sets between a bobby pin. This way you will later easily weave the threads through the links of the bracelet.
- Lay the threads to the left side of the bracelet.
- Now, pull the first color from under the first link over the top of the left side.
- Continue by laying the second color over the first. Pull it from under the same link and over the top left again.
- Continue repeating the same steps until you reach the end of the bracelet.
- Once you have reached the end, finish the bracelet with a knot. Trim the ends.
- Voila! Your new colorful chain-and-thread bracelet is ready to wear it.