Hello, fashionistas! Are you in for another DIY hairstyle adventure? If yes, stay with us, because in the following gallery we have selected for you the best DIY hairstyle tutorials ever seen. Learn how to DIY a perfect hairstyle in only a few easy steps. These DIY hairstyle tutorials will teach you to do it step by step. Most of them won’t take you more than 10 minutes which makes them the perfect DIY hairstyle tutorials even when you are in a rush in the morning. Try any of the hairstyles presented below and share your experience with us. You will definitely adore them since there is something for everybody’s taste and hair length. Enjoy!
1. Hair Tutorial – Half-Up Headband

2. How-To: Braided Crown Hair Tutorial
This is one of those DIY hairstyle tutorials that you must try on right now. You will adore how your hair looks and how easy it will be for you to get the look. Here are the steps to follow:
- First, start with a middle part and section the left side just behind your ear. This is precisely the place where you should start your braid.
- Begin braiding toward the back center of your head. Then, fasten with pins right below the crown area.
- Repeat the same procedure with the other side of your part.
- Next, pull the second braid under the fastened one so they meet in the middle.
- Use pins to fasten both braids until they feel secure.
- Take the com and create a volume on top by carefully loosening the hair.
- Hide any stray ends.
- Finish the look with hairspray.
- Voila, your braided crown is done!

3. Cotton candy bun- hair tutorial

4. How to do a messy bun
Are you a fan of DIY hairstyle tutorials? If yes, you will definitely adore this one showing you step-by-step how to DIY a messy bun. Here are the steps to follow:
- First, take a hair elastic and secure your hair in a high ponytail. The best is to secure the hair in the center of your head.
- Then take your comb and backcomb the hair from the ponytail.
- Wrap the hair around the hair tie in a rough shape of a bun.
- Once you get the basic shape of the bun, secure it with your hair grip of choice.
- Finally, finish everything with hairspray. Enjoy!


5. Bohemian side braid festival hair tutorial


6. Holiday Hair Week: The Half Crown Braid


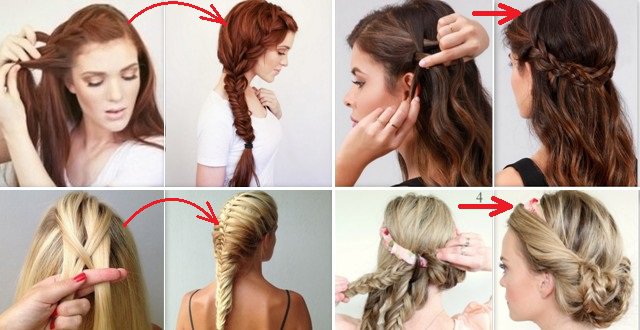
7. Hair Style FISHTAIL and Tutorial


8. Fishtail Braid Tutorial
This is definitely one of the best DIY hairstyle tutorials on how to DIY a fishtail braid hairstyle. And, the easiest one! You will simply adore it. Here are the steps:
- First, divide your hair into two even sections.
- Start braiding by taking a thin strand of hair from the left section.
- Pull the thin strand up and across the left section and move it across the right one.
- Tuck the thin strand under the right section making it become part of the right section.
- Tug gently on both sections so you tighten them.
- Now, take a thin strand from the right section and pull it up and across the right section. Move it across the left section.
- Tuck it under the left section until it becomes part of the left section.
- Keep repeating the same procedure until you reach the end of your hair.
- Wrap a hair tie around the end of your hair and secure the strands with a bobby pin.
- Voila, your fishtail braid hairstyle is done!

9. Braid 5-tuck and cover fishtail braids

10. The Super Chic, Low Rolled Updo Hair Tutorial

11. How to Fishtail Braid

12. Bohemian Half-Up Fishtail Braid Tutorial


13. Braided Half Updo

14. Fishtail Mermaid Braid
Once you learned to DIY the basic fishtail braid, it is time to upgrade your knowledge with one of the easiest DIY hairstyle tutorials for a mermaid fishtail braid. Here are the steps:
- First, gather up a section of hair at the crown of your head.
- Split it into two even halves.
- Start by pulling up a thin strand from the left side of your head. Then, pull the strand across the left and towards the right section.
- Tuck it across the left section and towards the right section.
- Then, take a thin strand of hair from the right side of the head and pull it across the right section and towards the left.
- Tuck it under the left section.
- Keep repeating the same steps over and over again until you reach the base of the head. You can stop here, or you can continue braiding a classic fishtail braid.
- If you have chosen to continue, then keep braiding the hair in a fishtail braid until you reach the end of the hair.
- Use a hair tie to wrap around the braid ends.
- Voila, you are done!