Hello DIY lovers. Are you ready for some new, inspiring and useful DIY project ideas? We invite you to stay connected with us and discover the easiest DIY scarf projects ever. As you may know, scarves are one of the most stylish accessories that can bring any outfit a level up. If you want to wear them, and you still enjoy the DIY projects, why don’t you put these both loves into one and try to get your own DIY scarf? Scroll down the page to get inspired by our gallery presenting the best DIY scarf step-by-step tutorials ever. The best about these following projects is that they won’t cost you anything since they are all made of supplies that you already have at home. All you need is your creativity turn on MAX.


DIY Anthropology scarf tutorial
This is definitely the easiest DIY scarf project ever. You will adore its simplicity and at the same time its beauty. All you need for your scarf project are the following materials:
- A long strip of fabric
- Sewing machine
- Beads with large threading holes
- Glue
- Needle and thread
- Jersey flowers
Take the long strips of fabric and hem up the edge using a gathering stitch. Repeat the same procedure with the other side of the fabric. Using your sewing machine and some basic sewing skills, sew a gathering stitch straight down the middle. Finish off the ends of the scarf. Finally, take the Jersey flowers and attach them to the scarf at the location you like. Your anthropology scarf is done!


DIY Braided infinity scarf tutorial
Are you ready for the chicest DIY scarf ever? Here is what you will need for the project:
- 2 long rectangles of fabric (recommendable in two different colors)
- Thread in the same color as one of the fabrics
- Hand-sewing needle
First, fold each rectangle lengthwise, matching up the war longest edges. Using the needle sew with a zig-zag stitch, backstitching at each end. Turn right side out. As presented in the images from the tutorial, start making your braid. Layout the finished knot into an X shape. Match up the top tails of the X and bring the raw circular end together. Find the seams and align them side by side. Pinch the two inner layers together. Take the pinched parts together and start sewing using your needle. Once you have finished, flip the end right side out. Sew any opening if there are some, and enjoy your new scarf, because you are already done!


DIY “wrapped in bows” scarf tutorial
When it comes to DIY scarf projects this is definitely our favorite one. It is easy to do and the result is so adorable. You can make this kind of scarf for your little one, and rock the matching outfits together. All you will need for this project are two equal scarves. The instructions are so simple. Here we go with them:
First, sew two scarves together making one long. Trim the tassels from the ends where you sew them to stay together. Make approximately 6 new pleats by sewing the scarf to itself creating a loop. See the image to get the right point of this step. Then flatten the loops and tie a ribbon around the middle. Done!


DIY buttoned-up infinity scarf
Scarves are those adorable accessories that keep you styling and warm during the colder days. Here is some DIY scarf project that will keep you absolutely stunning during the fall. The needed supplies for this project are the following ones:
- An old knit scarf
- Buttons
- Leftover pieces of yarn ( opt for yarn in a different color from the buttons, so it can be more visible)
First, line up the buttons on one end of your old scarf. Then cut out two pieces of yarn for your buttons. Once you have done it, we are ready for the instructions:
Take your two pieces of yarn and poke them through your buttonholes using a skewer. Then, using the skewer poke the yarn through the scarf. Double or triple knot until you are sure that the buttons are going to stay in place. Voila, your buttoned-up infinity scarf is finished.


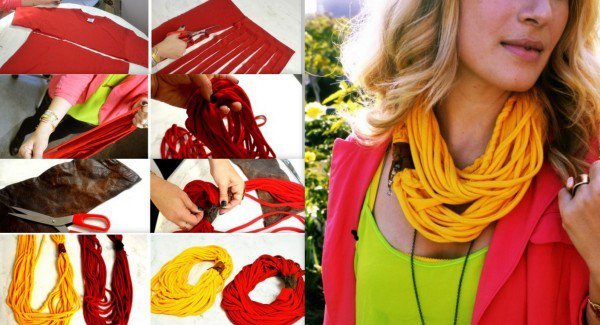
The no-sew T-shirt scarf
Are you ready for the easiest DIY scarf project ever? This no-sew T-shirt scarf is going to become your favorite DIY project for this spring. In order to upcycle an old T-shirt into a stylish scarf, you will need only one supply: an old T-shirt. And, scissors of course!
First, cut the bottom hem off of your old T-shirt. Then cut the piece into few horizontal strips. Stretch the loops. Then collect them together and pull them once more to make them all even in length. Finally, double loop the loops. Voila, your scarf is done. The best bout this scarf is that you can also wear it as a necklace.